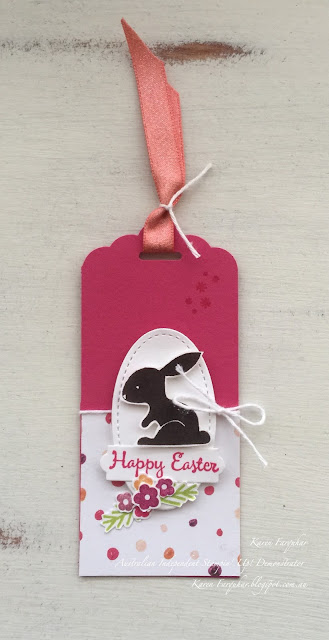
Just Hopped By

Hello and welcome. Global Design Project #GDP126 is a sketch design challenge.

 As soon as the sketch was released I envisaged an Easter card with an Easter egg as the oval shape and it just so happens that the Hello Easter stamp set in our current Stampin' Up! Occasions Catalogue has the perfect size image for this sketch.


You may ask what is the relevance of the title of this post? Well while I was busy playing around with this set a little chocolate coloured bunny rabbit hopped onto our front lawn. After talking to a number of our neighbours we discovered he belonged to one of our neighbouring families who had gone away for the weekend. Their pet bunny had decided to take advantage of their absence and investigate the neighbourhood.

He actually stayed for three days. We fed him and gave him water and he made himself quite at home snuggling up on our front lawn to sleep of a night.
He was impossible to catch and we were afraid of chasing him in case he ran onto the road and into oncoming traffic. So there he stayed.  


 Meet Thumper 🐰

Now for my projects. I really enjoyed playing with this set. There are 2 different sized eggs in the set, a rabbit, flowers and some greenery. I have only stamped one of the eggs so far but I can see me attempting lots more Easter projects with this set. 


I have made a variety of projects ready for Easter treat giving. The PDF instructions for the Easter egg box and the chocolate carrot gift container can be purchased at Erica Cerwin's website along with many more instructions for her brilliant projects.


For this project I have continued the sketch design and attached it to the front of an Acetate Card Box. These boxes are a perfect size to hold 6 of your handmade cards and envelopes however I will probably fill mine with some small Easter eggs wrapped to coordinate with the packaging.


This little box will hold a medium sized Easter egg or you could use our Gusseted Cellophane Bags and fill them with small treats, a pretty ribbon tied at the top and you have a lovely gift for that special person.


I just had to stamp a bunny in Chocolate Chip to add to a gift card as a tribute to Thumper my little weekend visitor. 


So if you are wondering what has happened to Thumper. His family arrived home Sunday afternoon and managed to catch him using a net. He is now home safe and sound. At least until next time he decides he might sneak out for another adventure.

If you have enjoyed looking at my creations today HOP on over to the Global Design Projects website for more inspiration. For your convenience I have listed below the products I have used in my projects. If you click on the photograph it will take you straight to my online store where if you are an Australian resident you can purchase at anytime.
Thank you for hopping 🐇 by today and happy stamping.      


Product List


your photo name

Lots of Lavender

Hello and welcome to my website I am excited to be taking part in the Inspire.Create. Stamping Challenge #011 Sketch Challenge this week.


The fragrance of lavender always brings back childhood memories for me. My Mother would often have lavender scented satchels stowed in her clothes draws. She would say that they were not only pretty but would make her clothing and delicates smell lovely. Apparently dried lavender is also a natural repellent to moths, aids relaxation if a satchel is placed under your pillow before sleeping and a drop or two of lavender oil added to a bath makes for a soothing soak. I personally just love the fragrance.

When I found some beautiful lavender gifts in our local gift shop I was immediately reminded of my Mum. She celebrates her Birthday this week then came the light bulb moment- the perfect Birthday gift of my pretty lavender finds and a coordinating card created with our gorgeous Lots of Lavender free Sale-A-Bration stamp set!

So using the Inspire.Create.Challenge sketch I set about creating a card and matching gift tag.


I wanted a fuller bunch of lavender on the card front so I stamped  the lavender bunch four times on scrap paper then coloured the images with my Wisteria Wonder, Elegant Eggplant, Lemon Lime Twist and Crumb Cake Stampin' Write Markers before fussy cutting stems of blooms and layering them into a bunch with Mini Glue Dots and Stampin' Dimensionals. I added extra stems below the bow so the bunch would not look too top heavy.


Then just for the heck of it I stamped extra bunches of the lavender spray image. This time however I coloured the flowers with my Night of Navy Stampin' Blends. I again fussy cut the stems of blooms but added less layers for a smaller spray.  


 For a final touch I prettied up my envelopes with the Petal Pair Textured Impressions Embossing Folders.


Thank you for joining me today. I hope you have gained some ideas and for more inspiration pop on over to the Inspire.Create.StampingChallenges site. 
Happy stamping!


Product List


your photo name

Hop on Your Bike


Hello and a warm welcome. Global Design Project #GDP125 is a colour challenge.


I can honestly say that I did struggle with this one but I decided to make a little easel greeting card for my eldest Granddaughter who commences her first year of University next week. 
The pushbike is to symbolise her passage away from childhood toys and her embarkment into a new adult world.


I felt the sentiment "Good Things Are Going to Happen", from the stamp set You've Got This were appropriate words of encouragement to ease her feelings of apprehension as she starts this next phase of her journey.


Having completed this card I then decided to challenge myself by using the same stamp set Bike Ride  and the GDP challenge colours again.


  By swapping around the colours Melon Mambo, Daffodil Delight and Dapper Denim and the various images in the Bike Ride stamp set I have created 3 different cards which could be given to a male or female for any number of occasions.


Just a couple of little hints for you today. 

I have used Stampin' Ups! Multipurpose Adhesive Sheets to adhere the tiny pieces when constructing the bikes finding this much easier and less messy than using the liquid adhesives. I stamped the images onto a scrap piece of whisper white cardstock then adhered it to a Multipurpose Adhesive Sheet.  I die cut the images using my Big Shot Die-Cutting Machine then simply peeled off the backing and built my bike. No smudges or sticky fingers. Magic!

Also the pebbles are an embossing die which is included in the Build a Bike Framelits Dies. I found I needed to add an extra piece of cardstock to the sandwich layer as a shim to obtain a well embossed image. I embossed onto whisper white cardstock however a thicker cardstock may not need the shim.


Don't forget Sale-A-Bration is still continuing and Stampin' Up! have added even more gorgeous products which you can earn for FREE! All available from my Online store.


   Thank you for visiting me today I hope you have gained some inspiration. Below I have included the link to the products I have used for your convenience.
Happy Stamping.


Product List
Big Shot
[143263]
$159.00


your photo name